Saturday, June 14, 2014

Oracle SOA 12c 2Way SSL Extracting Private Key using OpenSSL

This thread explains on the steps to convert .pfx files to JKS


  • Run the attached OpenSSL command to extract the certificate from the .pfx file
openssl pkcs12 -in filenameWithPrivateKey.pfx -out mindtelligent.crt -nodes

  • Open the file mindtelligent.crt and cut/past the following section ina file called MindTelligent.key

-----BEGIN RSA PRIVATE KEY-----
(Block of Encrypted Text)
-----END RSA PRIVATE KEY-----

  • The Rest of the file mindtelligent.crt will have Server Certificate, Root Certificate, and Intermediate Certificate. 

  • Follow the Blog Post here, for creating an Identity Key Store

Tuesday, June 10, 2014

Oracle Service Bus 11g 11.1.1.8 : How to export an OSB project from OSB console and import it in OEPE

Oracle Service Bus 11g 11.1.1.8 : How to export an OSB project from OSB console and import it in OEPE

1.) On the Right Hand Side pane, select System Administration


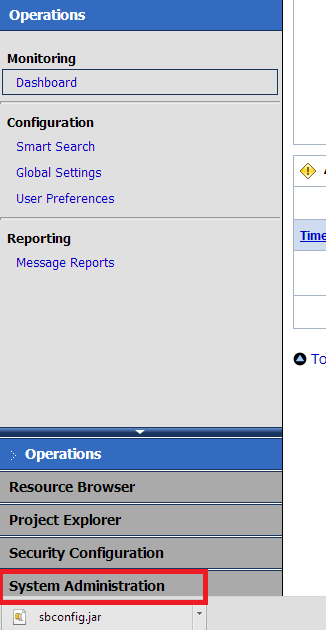
2.) Click on Export Resources


3.) Check the project you want to export and click "Export" This will create an export file 

4.) Save the .jar file (sbconfig.jar) in a location. We will use this file in OEPE

5.) Assuming if the Eclipse was installed in the folder c:\OSB, please execute C:\OSB\Oracle\Middleware\oepe\eclipse.exe  to start eclpipse.

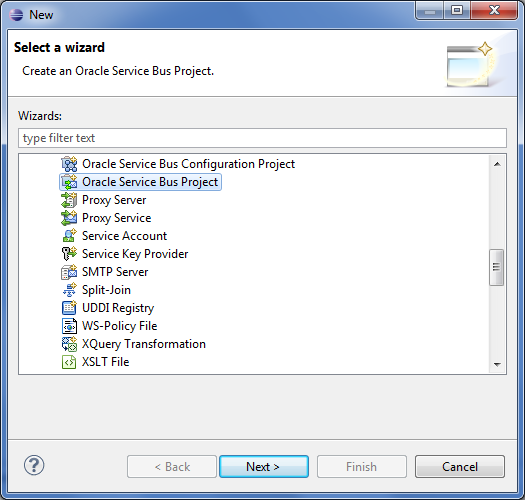
6.) On Eclipse, click on New--> Other--> Oracle Service Bus
7.) Press Next
8.) Put the project name. This may be the same name as the name of the project in OSB console

9.) This will create a project in Eclipse and open Eclipse's OSB perspective.

10.) Right click on Project and import the jar file


11.) Select the jar file that from exported from OSB console

12 .) Select all the check boxes and press Finish

13.) The project is imported. Right click on the Proxy service and Run the service on Server. Please ensure that you have already created the connection using URL:

http://oraclesoaandoim.blogspot.com/2012/04/oracle-service-bus-11115-create-server.html   


Thursday, June 5, 2014

Creation of OES SM (Security Module) instance

    The requirements for creating an OES SM instance depend on the type of SM that you create. Detailing the configuration settings for each type of SM is beyond the scope of this tutorial. For this reason, you will focus on creating a WebLogic SM because it is one of the most common SM types.
    When creating a WebLogic SM instance, consider these points:
    1. The SM configuration file (often referred to as the SMConfig file) contains the configuration used to set up the OES SM aspect of the configuration. It provides the policy distribution, policy decision, and policy enforcement points.
    2. The WebLogic domain is the application server used to deploy your applications. When creating an OES WebLogic SM, you run WebLogic Configuration Wizard as part of the process.
    3. Although WebLogic Configuration Wizard runs automatically, you must select one of the following SM options. This tutorial shows you how to create a non-JRF WebLogic SM.
      • Non-JRF WebLogic SM
      • JRF WebLogic SM
      • Web Service SM on WebLogic
      • Oracle Service Bus (OSB) SM on WebLogic
      • Other options for Managed Servers
     

    Configuring the SMConfig Properties File

      You create all OES SMs by using the SMConfigTool. This tool uses a configuration file called SMConfig, which contains the settings used to configure an SM instance. This section guides you through configuring an SM and running the SMConfigTool to create a WebLogic SM instance and domain.
      In a terminal window, navigate to the OES folder that contains sample SMConfig files, copy the smconfig.prp file to a new file named wls_smconfig.prp, and open the new file for editing:
      cd $MW_HOME/oes_client/oessm/SMConfigTool
      cp smconfig.prp wls_smconfig.prp
      gedit wls_smconfig.prp &
      Use the following table to change the settings in the file:
      Property
      Value
      Purpose
      oracle.security.jps.runtime.pd.client.
      policyDistributionMode
      controlled-push
      Sets the distribution mode for how the SM obtains its OES policy set
      oracle.security.jps.runtime.pd.client.
      RegistrationServerHost
      localhost
      The host of the OES Administration Server that is used for registering the SM instance with the Administration side.
      oracle.security.jps.runtime.pd.client.
      RegistrationServerPort
      7002
      The SSL port of the OES Administration Server that is used for registering the SM instance with the Administration side.
      oracle.security.jps.policystore.type
      DB_ORACLE
      Specifies the repository type used for the OES security store. OES policies and related artifacts are stored in this store.
      oracle.security.jps.farm.name
      cn=oes_admin
      Defines the root distinguished name (RDN) format of the domain node in the LDAP policy store. This name matches the domain name used when the OES Administration Server was created. If the name does not match, policy distribution does not work properly, and the policy set does not work.
      oracle.security.jps.ldap.root.name
      cn=jpsroot
      Defines the top (root) entry of the LDAP policy store directory information tree (DIT).
      oracle.security.jps.pd.clientPort
      8002
      The SSL port used by the SM instance for policy distribution in a controlled-push distribution model.
      oracle.security.jps.runtime.pd.client.
      sm_name
      people
      The name of the SMConfigID that correlates a policy set defined in an application to a particular SM instance. This ID is configured within the OES Administration console and is bound to the People application that contains the policy used for this tutorial.


      Save and close the file.
     

    Running the SMConfigTool

      After the SMConfig file is ready, you run the SMConfigTool, which reads the SMConfig file and some parameters for instructions about creating your SM instance.
      In a terminal window, execute the following steps to create a WebLogic SM instance by using the OES SMConfigTool:
      • Navigate to the OES SM Client bin folder:

        cd ../bin
      • Execute the SMConfigTool as follows to create the SM instance and invoke the WebLogic domain Configuration Wizard:

        ./config.sh -smConfigId people -smType wls -onWLS -serverLocation $WL_HOME -prpFileName ../SMConfigTool/wls_smconfig.prp

        First, this creates an SM instance in the $MW_HOME/oes_client/oes_sm_instances folder called people. The first thing you must know about a WebLogic SM is that the files in this folder are mainly ignored and are not used by your WebLogic domain. The files for your domain are created for this type of SM in the$DOMAIN_HOME/config/oeswlssmconfig folder. Each server configured for the domain will have a folder that matches its server name within this folder. Each folder contains the OES SM configuration for that particular server. In this case, there will be only an AdminServer folder because you are creating a single server domain.
      • Welcome: Select "Create a new WebLogic domain" and click Next.
      • Select Domain Source: Select Oracle Entitlements Server WebLogic Security Module - 11.1.1.0 [oes_client] and click Next.
      • Specify Domain Name and Location: Enter the values listed in the following table and then click Next:
        FieldValue
        Domain name:mydomain
        Domain location:/u01/app/oracle/fmw/user_projects/domains

      • Configure Administrator User Name and Password: Enter weblogic as the user name and welcome1 as the password, and click Next.
      • Configure Server Start Mode and JDK: Leave all default values, and click Next.
      • Select Optional Configuration: Select Administration Server and click Next.
      • Configure the Administration Server: Enter the values listed in the following table and then click Next:
        FieldValue
        Listen Port:8001
        Enable SSL:True
        SSL Listen Port:8002

      • Configuration Summary: Click Create.
      • Creating Domain: Click Done.
      Now that you have created your domain, you can start it and deploy an application to it for testing.

Installation of OES client 11g Release 2

Installation of OES client 11g Release 2


    The OES architecture is composed of two components that work together to form the overall solution of the product:
    • The OES Administration side manages OES policies and their related artifacts.
    • The OES Security Module (SM) Client side provides policy enforcement and decision points for applications.
    This section shows you how to install the OES SM Client product. This process installs the product's files only on the file system. It does not include any configuration or association with any applications. The next section covers how to create an SM instance by  using the OES SM Client product.
    Perform the following steps to install the OES SM Client product:
    • In a terminal window, navigate to the folder containing product binaries and execute the OES SM Client installer:
      cd /stage/fmw/oes_client/Disk1
      ./runInstaller -jreLoc /u01/app/oracle/fmw/jdk1.6.0_34
    • Welcome: Click Next.

    • Prerequisite Checks: Verify that all prerequisites passed and click Next.

    • Installation Location: Enter the Oracle Home Directory: /u01/app/oracle/fmw/oes_client.

    • Installation Summary: Click Install.

    • Installation Progress: When the Progress bar displays 100%, click Next.

    • Installation Complete: Click Finish.

    Now that you have installed the OES SM Client product, you are ready to create a new WebLogic domain. You will configure it to use an OES WebLogic SM instance.

Oracle Entitlement Server 11g Release 2: Creating the OES Administration Domain


Oracle Entitlement Server 11g Release 2: Creating the OES Administration Domain


Prior to creation of domain, please ensure that you follow the following steps:


    In a terminal window, perform the following commands to create the OES Administration Domain:
    $ cd /u01/app/oracle/fmw/Oracle_IDM1/common/bin
    $ ./config.sh
    After the Configuration Wizard opens, perform the following steps to create the domain:
    • Welcome: Select "Create a new WebLogic domain" and click Next.

    • Select Domain Source: Select Oracle Entitlements Server for Admin Server - 11.1.1.0 [Oracle_IDM1], accept the automatically selected Oracle Platform Security Service - 11.1.1.0 [Oracle_IDM1], and click Next.

    • Specify Domain Name and Location: Enter the following information and then click Next:
      Domain name: oes_admin
      Domain location: /u01/app/oracle/fmw/user_projects/domains

    • Configure Administrator User Name and Password: Enter the following information and then click Next:
      Name: weblogic
      User password: welcome1

    • Configure Server Start Mode and JDK: Perform the following actions:
      1. Select Development Mode.
      2. Select Available JDKs and Sun SDK 1.6.0_34.
      3. Click Next.


    • Configure JDBC Component Schema: Perform the following actions:
      1. Select the OPSS Schema.
      2. Enter localhost as the host name.
      3. Enter oracle as the Schema password.
      4. Leave the rest as the default values.
      5. Click Next.


    • Test JDBC Component Schema: Verify that the test was successful and click Next.

    • Select Optional Configuration: Click Next.

    • Configuration Summary: Click Create and wait for installation processing to complete.

    • Creating Domain: When the Progress bar displays 100%, click Done.

    Now that you have created the OES Administration domain, you can configure it to use the database for the security store.
    Assume the following:
    $MW_HOME=/u01/app/oracle/fmw
    $IDM_HOME=$MW_HOME/Oracle_IDM1
    In a terminal window, perform the following commands to configure OES to use a database security store:
    cd /u01/app/oracle/fmw/Oracle_IDM1/common/bin
    $MW_HOME/oracle_common/common/bin/wlst.sh $MW_HOME/Oracle_IDM1/common/tools/configureSecurityStore.py -d $MW_HOME/user_projects/domains/oes_admin -t DB_ORACLE -j cn=jpsroot -m create -p oracle
    OptionPurpose
    -dSpecifies the name and location of the OES Administration domain
    -tSpecifies the type of security store to associate with the OES Administration server
    -jSpecifies the jpsroot value of the OES security store
    -mSpecifies the tool mode, which indicates if the tool will create, drop, or join an OES database security store
    -pSpecifies the password to the OES database
    Your output should be similar to the following:
    Initializing WebLogic Scripting Tool (WLST) ...
    Welcome to WebLogic Server Administration Scripting Shell
    Type help() for help on available commands
    Info: Data source is: opss-DBDS
    Info: DB JDBC driver: oracle.jdbc.OracleDriver
    Info: DB JDBC URL: jdbc:oracle:thin:@localhost:1521/orcl
    INFO: Found persistence provider "org.eclipse.persistence.jpa.PersistenceProvider". OpenJPA will not be used.
    INFO: Found persistence provider "org.eclipse.persistence.jpa.PersistenceProvider". OpenJPA will not be used.
    [oracle.security.jps.internal.config.db.DbCredStoreServiceConfigurator] checkServiceSetup - done
    Dec 1, 2012 3:52:30 AM oracle.security.jps.internal.config.ldap.LdapCredStoreServiceConfigurator schemaCompatibleHandler
    INFO: Credential store schema upgrade not required. Store Schema version 11.1.1.6.0 is compatible to the seed schema version 11.1.1.4.0
    [oracle.security.jps.internal.config.db.DbCredStoreServiceConfigurator] checkServiceSchema - Store schema has been seeded completely
    [oracle.security.jps.internal.config.db.DbCredStoreServiceConfigurator] updateServiceConfiguration - done
    Dec 1, 2012 3:52:36 AM oracle.security.jps.internal.tools.utility.JpsUtilMigrationCredImpl migrateCredentialData
    INFO: Migration of Credential Store data in progress.....
    Dec 1, 2012 3:52:37 AM oracle.security.jps.internal.tools.utility.JpsUtilMigrationCredImpl migrateCredentialData
    INFO: Migration of Credential Store data completed, Time taken for migration is 00:00:00
    [oracle.security.jps.internal.config.db.DbCredStoreServiceConfigurator] migrateData - done
    [oracle.security.jps.internal.config.db.DbCredStoreServiceConfigurator] testJpsService - done
    [oracle.security.jps.internal.config.db.DbKeyStoreServiceConfigurator] checkServiceSetup - done
    Dec 1, 2012 3:52:37 AM oracle.security.jps.internal.config.ldap.LdapKeyStoreServiceConfigurator schemaCompatibleHandler
    INFO: Keystore schema upgrade not required. Store Schema version 11.1.1.6.0 is compatible to the seed schema version 11.1.1.4.0
    [oracle.security.jps.internal.config.db.DbKeyStoreServiceConfigurator] checkServiceSchema - Store schema has been seeded completely
    [oracle.security.jps.internal.config.db.DbKeyStoreServiceConfigurator] updateServiceConfiguration - done
    [oracle.security.jps.internal.config.db.DbKeyStoreServiceConfigurator] migrateData - done
    [oracle.security.jps.internal.config.db.DbKeyStoreServiceConfigurator] testJpsService - done
    [oracle.security.jps.internal.config.db.DbPolicyStoreServiceConfigurator] checkServiceSetup - done
    Dec 1, 2012 3:52:40 AM oracle.security.jps.internal.config.ldap.LdapPolicyStoreServiceConfigurator schemaCompatibleHandler
    INFO: Policy schema upgrade not required. Store Schema version 11.1.1.6.0 is compatible to the seed schema version 11.1.1.4.0
    [oracle.security.jps.internal.config.db.DbPolicyStoreServiceConfigurator] checkServiceSchema - Store schema has been seeded completely
    [oracle.security.jps.internal.config.db.DbPolicyStoreServiceConfigurator] updateServiceConfiguration - done
    WLS ManagedService is not up running. Fall back to use system properties for configuration.
    Dec 1, 2012 3:52:52 AM oracle.security.jps.internal.tools.utility.destination.apibased.JpsDstPolicy migrateData
    INFO: Migration of Admin Role Members started
    [oracle.security.jps.internal.config.db.DbPolicyStoreServiceConfigurator] migrateData - done
    Dec 1, 2012 3:52:53 AM oracle.security.jps.internal.tools.utility.destination.apibased.JpsDstPolicy migrateData
    INFO: Migration of Admin Role Members completed in 00:00:00
    [oracle.security.jps.internal.config.db.DbPolicyStoreServiceConfigurator] testJpsService - done
    [oracle.security.jps.internal.config.db.DbAuditStoreServiceConfigurator] checkServiceSetup - done
    Dec 1, 2012 3:52:53 AM oracle.security.jps.internal.config.ldap.LdapAuditServiceConfigurator schemaCompatibleHandler
    INFO: Audit store schema upgrade not required. Store Schema version 11.1.1.6.0 is compatible to the seed schema version 11.1.1.4.0
    [oracle.security.jps.internal.config.db.DbAuditStoreServiceConfigurator] checkServiceSchema - Store schema has been seeded completely
    [oracle.security.jps.internal.config.db.DbAuditStoreServiceConfigurator] updateServiceConfiguration - done
    Dec 1, 2012 3:52:53 AM oracle.security.jps.internal.tools.utility.JpsUtilMigrationAuditStoreImpl migrateAuditStoreData
    INFO: Migration of Audit Store data in progress.....
    [oracle.security.jps.internal.config.db.DbAuditStoreServiceConfigurator] migrateData - done
    Dec 1, 2012 3:53:15 AM oracle.security.jps.internal.tools.utility.JpsUtilMigrationAuditStoreImpl migrateAuditStoreData
    INFO: Migration of Audit Store data completed, Time taken for migration is 00:00:21
    [oracle.security.jps.internal.config.db.DbAuditStoreServiceConfigurator] testJpsService - done
    persist to output: /u01/app/oracle/fmw/user_projects/domains/oes_admin/config/fmwconfig - done
    INFO: Found persistence provider "org.eclipse.persistence.jpa.PersistenceProvider". OpenJPA will not be used.
    INFO: Found persistence provider "org.eclipse.persistence.jpa.PersistenceProvider". OpenJPA will not be used.
    [oracle.security.jps.internal.config.db.DbCredStoreServiceConfigurator] checkServiceSetup - done
    [oracle.security.jps.internal.config.db.DbCredStoreServiceConfigurator] updateServiceConfiguration - done
    [oracle.security.jps.internal.config.db.DbKeyStoreServiceConfigurator] checkServiceSetup - done
    [oracle.security.jps.internal.config.db.DbKeyStoreServiceConfigurator] updateServiceConfiguration - done
    [oracle.security.jps.internal.config.db.DbPolicyStoreServiceConfigurator] checkServiceSetup - done
    [oracle.security.jps.internal.config.db.DbPolicyStoreServiceConfigurator] updateServiceConfiguration - done
    Dec 1, 2012 3:53:25 AM oracle.security.jps.internal.config.ldap.LdapAuditServiceConfigurator checkIfConfigurationValid
    INFO: Audit store re-association not supported.
    [oracle.security.jps.internal.config.db.DbAuditStoreServiceConfigurator] checkServiceSetup - Audit store re-association not supported.
    persist to output: /u01/app/oracle/fmw/user_projects/domains/oes_admin/config/fmwconfig - done
    INFO: Found persistence provider "org.eclipse.persistence.jpa.PersistenceProvider". OpenJPA will not be used.
    Using default context in /u01/app/oracle/fmw/user_projects/domains/oes_admin/config/fmwconfig/jps-config-migration.xml file for credential store.
    Credential store location : jdbc:oracle:thin:@localhost:1521/orcl
    Credential with map Oracle-IAM-Security-Store-Diagnostics key Test-Cred stored successfully!
    Credential for map Oracle-IAM-Security-Store-Diagnostics and key Test-Cred is:
    GenericCredential
    Info: diagnostic credential created in the credential store.
    Info: Create operation has completed successfully.

OES 11g Rel 2 Installing OES Administration Software

OES 11g Rel 2 Installing OES Administration Software


Prior to installation of OES Admin Server, please ensure that the the database has been create using RCU. Please refer to the URL http://oraclesoaandoim.blogspot.com/2014/06/installation-of-oracle-entitlement.html for details

    In a terminal window, execute the OES Administration Server installation program as follows:
    $ cd /stage/fmw/iamsuite/Disk1
    $ ./runInstaller -jreLoc /u01/app/oracle/fmw/jdk1.6.0_34
    The OES Administration installation window opens. Perform the following steps to install the OES Administration Server product:
    • Welcome: Click Next.

    • Install Software Updates: Select Skip Software Updates and click Next.

    • Prerequisite Checks: Verify that all prerequisites passed and click Next.

    • Specify Installation Location: Accept the default values (/u01/app/oracle/fmw for Oracle Middleware Home and Oracle_IDM1 for Oracle Home Directory) and click Next.

    • Installation Summary: Click Install.

    • Installation Progress: When the Progress bar displays 100%, click Next.

    • Installation Complete: Click Finish.

    Now that you have installed the OES Administration product, you can install, create, and configure the OES Administration Server domain.

Installation Of Oracle Entitlement Server 11g Rel 2

    Installation Of Oracle Entitlement Server 11g Rel 2

    You create the OES database schema by using RCU.
     In a terminal window, execute RCU as follows:
    /stage/fmw/rcu/bin/rcu
    After the RCU installation window opens, perform the following steps to create the OES schemas:
    • On the Welcome page, click Next.

    • On the Create Repository page, accept Create (the default option) and click Next.

    • On the Database Connection Details page, accept the default setting for Database Type (Oracle Database), enter the fields in the following table, and then click Next.
      ParameterValue
      Host Name:localhost
      Port:1521
      Service Name:orcl
      Username:sys
      Password:oracle
      Role:SYSDBA


    • In the Repository Creation Utility - Checking Prerequisites dialog box, ensure that all prerequisite checks passed (look for green check marks in the first column), and click OK.

    • On the Select Components page, perform the following actions:
      1. accept the default setting of DEV for the "Create a new Prefix" value.
      2. In the Component column, expand AS Common Schemas and the select Metadata Services, Audit Services for OES, and Oracle Platform Security Services (OPSS) check boxes.
      3. Ensure that the schema names are DEV_MDS for Metadata Services and DEV_OPSS for Oracle Platform Security Services.
      4. Click Next.


    • In the Repository Creation Utility - Checking Prerequisites dialog box, click OK.

    • On the Schema Passwords page, accept the default selection ("Use the same passwords for all schemas"), enter oracle in the Password and Confirm Password fields, and then click Next.

    • On the Map Tablespaces page, a row for Metadata Services and OPSS is displayed.

      Because OES provides authorization features for OPSS, use this entry  to create the schema used for OES.

      Perform the following actions:
      1. Accept the default settings for tablespaces.
      2. Click Next.

    • The Repository Creation Utility dialog box indicates that the tablespaces do not exist and will be created.

      Click OK to create the tablespaces.

    • In the Repository Creation Utility - Creating Tablespaces dialog box, click OK.

    • On the Summary page, confirm that the settings are correct and click Create.

    • On the Completion Summary page, confirm successful creation of the component schemas and click Close.
    Now that you have created the OES database schemas, you can install the OES Administration Server.

OCI Knowledge Series: OCI Infrastructure components

  Oracle Cloud Infrastructure (OCI) provides a comprehensive set of infrastructure services that enable you to build and run a wide range of...